
How to Play Slotbound: Controls, Interface and Run Flow
How to play Slotbound: keyboard and controller controls, what every counter on screen means, the spin to absorb to defend loop, and how a run ends.
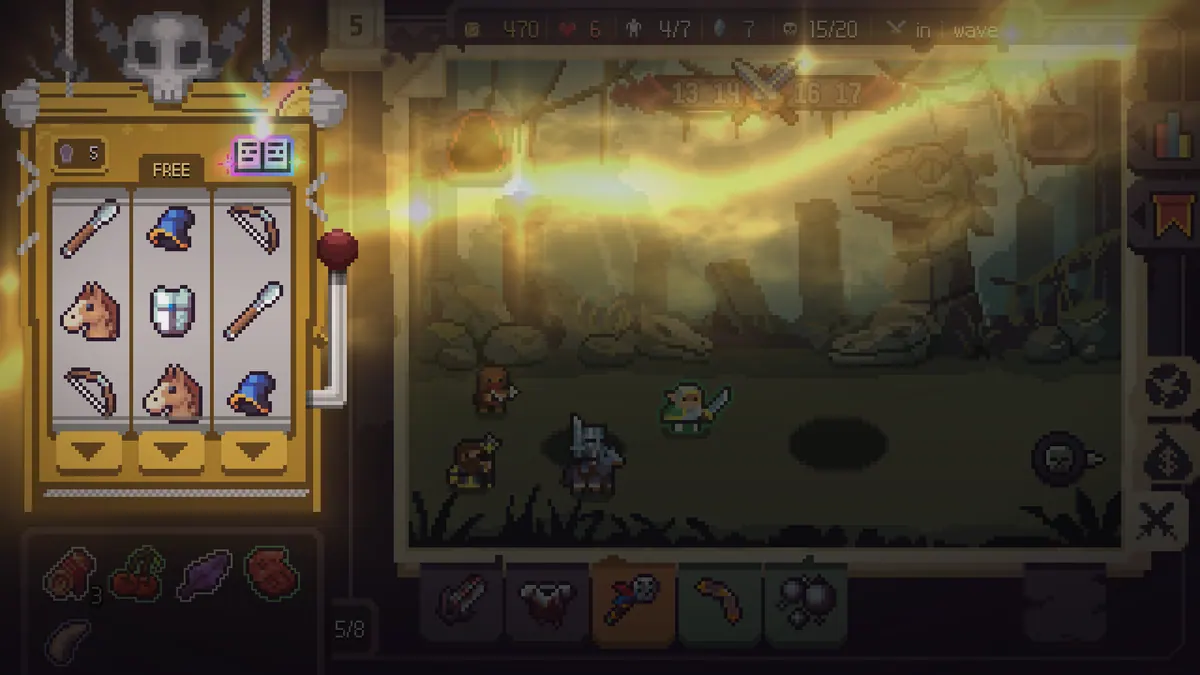
Press Space to spin, press A to enter absorb mode, and drag or click units onto the battlefield to place them. The left panel is the 3x3 slot machine, the row under it is your items, the strip along the bottom is your cores, and the top bar is gold, lives, army size, diamonds and enemies. Survive every wave, beat the boss, and the battlefield clears.
Slotbound is a single-player game with full controller support and a surprisingly dense screen. The tutorial covers the premise; it does not teach you where the eight core slots are or why your army counter says 6/7. This page is the interface tour, and it doubles as a control reference for keyboard, mouse and gamepad.
The controls
The game is playable with mouse and keyboard or with a controller. The official build added keyboard and gamepad support in the 0.4.0 update, and the store page lists full controller support, so the pad layout is a first-class way to play rather than an afterthought.
| Action | Keyboard | Gamepad |
|---|---|---|
| Spin the machine | Space | Confirm / A equivalent |
| Toggle absorb mode | A | Face button for absorb mode |
| Select a unit | Left click | Move cursor and confirm |
| Place or move a unit | Drag with left click | Pick up, move, confirm |
| Lock a unit | Unit panel toggle | Unit panel toggle |
| Pause and menu | Escape | Start |
Two of these are worth memorising. The absorb toggle is a mode, not a single action: while it is on, clicking a unit marks it as material, so turn it off before you start moving units around. The manual lock is the safety catch that stops your carry from being offered up as food during cleanup.
The launch hotfixes also added Max FPS and window size settings, which matter on high-refresh monitors because the pixel art is rendered on a fixed grid and an uncapped frame rate makes the battlefield scroll faster than the waves actually resolve.
What every counter means
The top bar is the run state. Read it left to right.
| Position | Icon | Meaning |
|---|---|---|
| 1 | Coin plus a number | Gold, spent on upgrades and bought spins |
| 2 | Heart plus a number | Lives; you begin with six |
| 3 | Unit silhouette with two numbers | Units deployed over your current cap |
| 4 | Blue diamond plus a number | A second run currency, separate from gold |
| 5 | Skull with two numbers | Enemies left in the wave and the wave total |
| 6 | Text warning | Countdown such as "in 1 wave" or "In progress" |
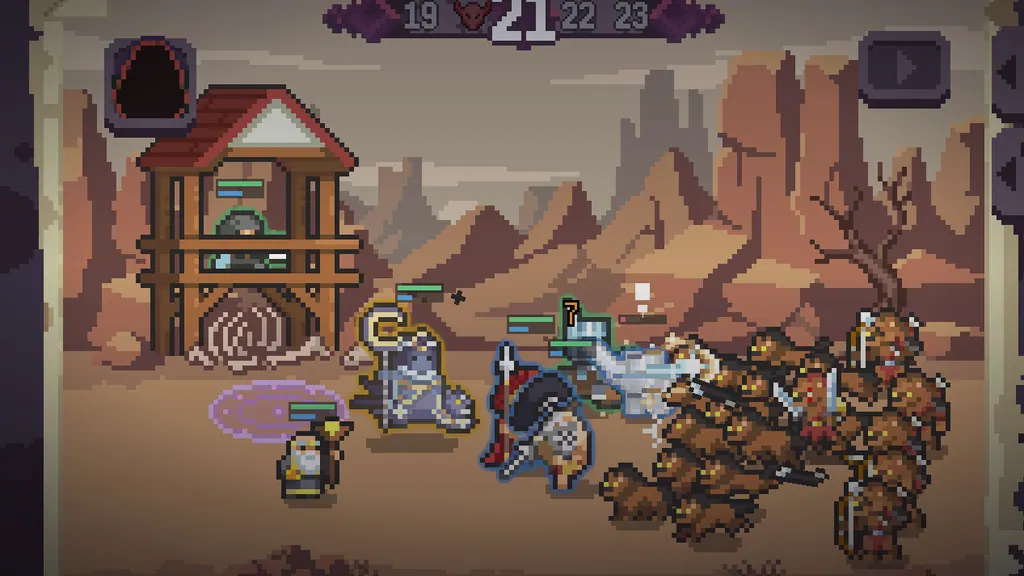
Below the battlefield, the wave badge shows a block of waves with the current one highlighted, and a boss wave replaces it with a named health bar. In the Wasteland screenshots that boss is called Bloodtail, with a red bar across the top of the field.
The three panels
The left panel is the machine. It is a 3x3 grid of symbols with a lever on the right side. The header above the grid holds a small counter, which shows your remaining free spins or re-spins, and a gold price, which is what buying another spin costs. Both numbers change as the run goes on.
Under the machine is the item row. Items are pickups: heals, gold bags, buffs and one-use effects. They are not equipped to units, they are held and spent, which is why the row can fill up with icons you never touched.
Along the bottom of the battlefield is the core strip. Cores are rule changes, and the count in the corner of the strip is the only honest measure of how strong your run is: 3/8 means you have taken three of eight core slots, 6/8 means six.
The loop, in order
A turn in Slotbound is not a turn, it is a wave cycle. It runs like this:
- Prepare. Positioning and absorbing are free between waves. An early build had a prep timer, and version 0.2.0 removed it, so you can take as long as you want before you commit.
- Spin. Spend a spin, read the board, and let the lines resolve into new units.
- Absorb. Feed duplicates and damaged bodies into your carry, promote when the option appears.
- Shop. Spend gold on the upgrade tree, and take a core when one is offered.
- Defend. The wave spawns. Units fight automatically; you control placement, not attacks.
- Repeat. Judgment waves check whether the army is actually scaling, and a boss wave ends the battlefield.
The game is real-time, but the store lists it as playable without timed input and playable at your own pace. In practice the pressure is in the prep phase: the wave does not start until you are ready, so a run is a sequence of decisions rather than an execution test.
Absorb mode, in detail
Turn absorb mode on, click the unit that should be consumed, then click the unit that should eat it. The eater gains experience toward its next star. At promotion thresholds a card offers a class branch, and the choice is permanent for that unit.
Three rules make this safe:
- Lock first. Manual lock keeps a unit out of the absorb pool. Lock your carry the moment you decide it is the carry.
- Feed away from the front. A unit that is holding a lane cannot be both your shield and your material.
- Promote with intent. A branch that gives a defensive option to a unit standing behind the line is a wasted promotion. The absorb guide→ explains which branch suits which role.
Winning and losing
You win a battlefield by surviving every wave and killing the boss. You lose when your lives run out: each enemy that reaches your side of the field costs a heart, and the Close Call achievement confirms that a run can be won with a single life left.
A lost run is not wasted in the permanent sense, because the achievements, the battlefield unlocks and the Hard clears all persist. What does not persist is the army, the cores, the items and the upgrades. That is the roguelite bargain: the knowledge carries over, the build does not.
Settings worth changing before your first run
- Difficulty. Adjustable difficulty is listed on the store page, and the launch hotfixes made stages one and two easier on the lower settings. Start there.
- Frame cap. Set Max FPS to your monitor's refresh rate or lower. The pixel grid looks cleaner and the battlefield stays readable.
- Window size. Set a window size you can actually read. The board symbols are small at 1080p on a laptop panel.
- Volume. Custom volume controls exist for a reason: the spin and jackpot audio is loud by design.
What to read next
If you have not cleared a stage yet, the beginner guide→ puts this interface to work on Open Forest. If you are losing waves and cannot tell why, the problem is usually the board rather than the army, so read the symbol guide→ next.
Sources
Official source: Slotbound on Steam ↗
- Steam store page ↗ for controller support, playable-at-your-own-pace tags and system requirements.
- Steam news hub ↗ for the 0.2.0 timer removal, the 0.3.0 control additions and the 1.0 hotfixes.
- Steam Community hub ↗ for player-posted control layouts and interface questions.
FAQ
Does Slotbound work with a controller?
Yes. Full controller support is listed on the store page, and keyboard and gamepad support were added officially in the 0.4.0 update. DualShock and DualSense controllers are both listed.
Can I pause during a wave?
The store lists playable without timed input and save anytime, and the pause menu is reachable with Escape on keyboard or Start on a pad. The wave does not advance while paused, so pausing is safe.
Is there a timer between waves?
No. Version 0.2.0 removed the wave preparation timer, so preparation is untimed. The only clock in the game is the clear-time leaderboard for a full campaign.
Why is my army counter showing a fraction?
The fraction is deployed units over your current cap. You raise the cap through the upgrade tree, and the cap is one of the reasons stacking economy upgrades early is better than buying a single expensive army node.